LG Refrigerator Not Cooling: Causes and Solutions
LG Refrigerator Not Cooling: Causes and Solutions: LG refrigerators are known for their reliability and performance, but sometimes they may fail to cool properly. This can be frustrating and inconvenient, especially if you have stored perishable food items in your fridge. Fortunately, there are some common causes and solutions for this problem that you can try at home before calling a professional technician. In this post, we will discuss the following topics:
- How to check if your LG refrigerator is not cooling
- The most common causes of LG refrigerator not cooling
- The best solutions for each cause
- How to prevent LG refrigerator not cooling in the future
- Frequently asked questions about LG refrigerator not cooling
What is an LG Refrigerator?
LG Refrigerator is a brand of refrigerators that are manufactured by LG Electronics, a South Korean company that produces various consumer electronics and home appliances. LG Refrigerator offers a wide range of models and features to suit different needs and preferences of customers. Some of the features that LG Refrigerator provides are:
- Smart Technology: LG Refrigerator has smart abilities with LG ThinQ App and Smart Cooling® system. LG ThinQ App allows users to control and monitor their refrigerator remotely using their smartphone or tablet. Users can adjust the temperature settings, check the ice and water status, receive alerts and notifications, and access smart recipes and tips. Smart Cooling® system uses sensors and vents to maintain optimal temperature and humidity levels inside the refrigerator and keep the food fresher longer.
- InstaView and Door-in-Door: LG Refrigerator has InstaView™ and Door-in-Door® features that enhance the convenience and accessibility of the refrigerator. InstaView™ design lets users see inside the refrigerator without opening the door by simply knocking twice on the glass panel. Door-in-Door® design lets users access their favorite items in an easy access compartment without opening the entire refrigerator door. This reduces the cold air loss and helps to save energy and preserve the freshness of the food.
- Craft Ice and Water Dispenser: LG Refrigerator has Craft Ice™ and water dispenser features that provide users with various options of ice and water. Craft Ice™ feature produces round ice balls that are perfect for cocktails, whiskey, and other beverages. The ice balls melt slower than regular ice cubes and do not dilute the drinks. Water dispenser feature provides users with filtered water and ice at their fingertips. Users can choose from crushed ice, cubed ice, or Craft Ice™ according to their preference. The water dispenser can also accommodate different sizes and shapes of containers with its measured fill and smooth touch functions.
- Large Capacity and Counter-Depth Design: LG Refrigerator has large capacity and counter-depth design features that offer users ample space and sleek style for their kitchen. LG Refrigerator has various sizes and styles of refrigerators that can fit different kitchen spaces and designs. From spacious standard-depth refrigerators to classic counter-depth models, users can choose the design that best suits their home and lifestyle. LG Refrigerator also has options for double door, multi door, French door, side-by-side, top freezer, bottom freezer, and specialty refrigerators that can meet different storage and organization needs of users.
LG Refrigerator is a brand of refrigerators that are innovative and reliable, with options for every type of kitchen space and style. LG Refrigerator is also energy-efficient and environmentally friendly, as it is ENERGY STAR® Qualified and exceeds the minimum federal energy standards. LG Refrigerator is a brand that customers can trust and enjoy for their home and family. For more information about LG Refrigerator, users can visit the official website or check out the online reviews and ratings.
How to Check if Your LG Refrigerator is Not Cooling
The first step to troubleshoot your LG refrigerator not cooling problem is to check if it is actually not cooling or if it is just a perception issue. Sometimes, the refrigerator may seem warmer than usual because of external factors, such as high ambient temperature, frequent door opening, or placing hot food inside. These factors can affect the cooling performance and the energy consumption of the refrigerator, but they do not necessarily indicate a malfunction or a defect.
To check if your LG refrigerator is not cooling, you can use an appliance thermometer or a digital thermometer to measure the temperature inside the fridge and freezer compartments. The ideal temperature for the fridge compartment is between 1°C and 7°C, and for the freezer compartment is between -15°C and -23°C. If the temperature is higher than these ranges, then your LG refrigerator is not cooling properly and needs further investigation.
How to Use an Appliance Thermometer or a Digital Thermometer to Measure the Temperature Inside the Refrigerator

An appliance thermometer or a digital thermometer is a device that can accurately measure the temperature inside the refrigerator and display it on a screen or a dial. You can use either type of thermometer to check if your LG refrigerator is not cooling, but you should follow some guidelines to ensure the accuracy and the reliability of the measurement. Here are some steps and tips on how to use an appliance thermometer or a digital thermometer to measure the temperature inside the refrigerator:
- Choose a thermometer that is designed for refrigerators and freezers. You can find them in most hardware or appliance stores or online. You can also use a regular digital thermometer, but make sure that it can measure temperatures below zero degrees Celsius.
- Place the thermometer in the center of the fridge or freezer compartment, away from the walls, the vents, the door, and the food items. This will ensure that the thermometer is measuring the average temperature of the compartment and not the temperature of a specific spot or object.
- Leave the thermometer in the compartment for at least 24 hours, without opening and closing the door frequently. This will allow the thermometer to stabilize and adjust to the temperature of the compartment and give a more accurate reading.
- Read the temperature on the screen or the dial of the thermometer and compare it with the ideal temperature range for the fridge or freezer compartment. If the temperature is higher than the ideal range, then your LG refrigerator is not cooling properly and needs further investigation. If the temperature is within the ideal range, then your LG refrigerator is cooling properly and you may have a perception issue. You can try adjusting the temperature settings or following some of the tips in the next section to improve the cooling performance and the energy consumption.
The Most Common Causes of LG Refrigerator Not Cooling
There are several possible reasons why your LG refrigerator is not cooling, ranging from simple to complex. Some of the most common causes are:
- Dirty condenser coils
- Faulty condenser fan
- Faulty evaporator fan
- Faulty start relay
- Faulty start capacitor
- Faulty thermistor
- Faulty compressor
- Low refrigerant level
Let’s look at each cause in detail and how to fix it.
Dirty Condenser Coils
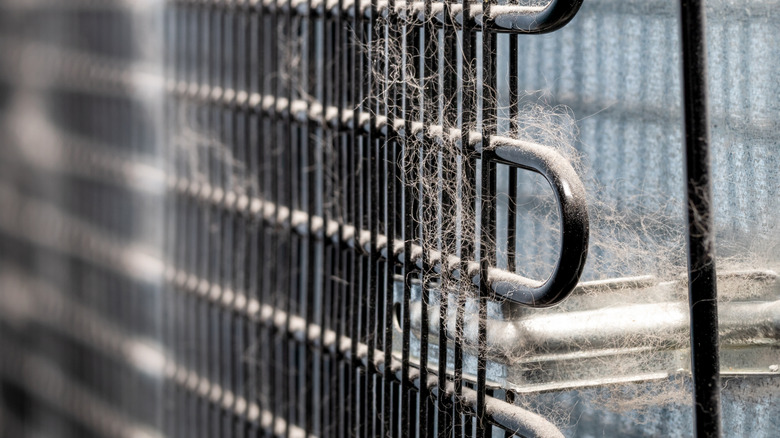
The condenser coils are located at the back of the refrigerator and are responsible for releasing the heat that is absorbed by the refrigerant from the inside of the fridge. Over time, the condenser coils can get dirty and dusty, which reduces their efficiency and makes the refrigerator work harder to cool down. This can result in higher energy consumption and poor cooling performance.
Solution: Clean the Condenser Coils
To clean the condenser coils, you will need a vacuum cleaner, a soft brush, and a cloth. Follow these steps:
- Unplug the refrigerator from the power source and move it away from the wall to access the back panel.
- Remove the screws that secure the back panel and take it off.
- Locate the condenser coils and inspect them for dirt and dust. If they are dirty, use the vacuum cleaner to remove the loose dust and then use the brush to gently scrub the coils. Be careful not to damage the coils or bend the fins.
- Wipe the coils with a damp cloth and let them dry completely.
- Replace the back panel and secure it with the screws.
- Plug the refrigerator back in and check if the cooling performance has improved.
Faulty Condenser Fan
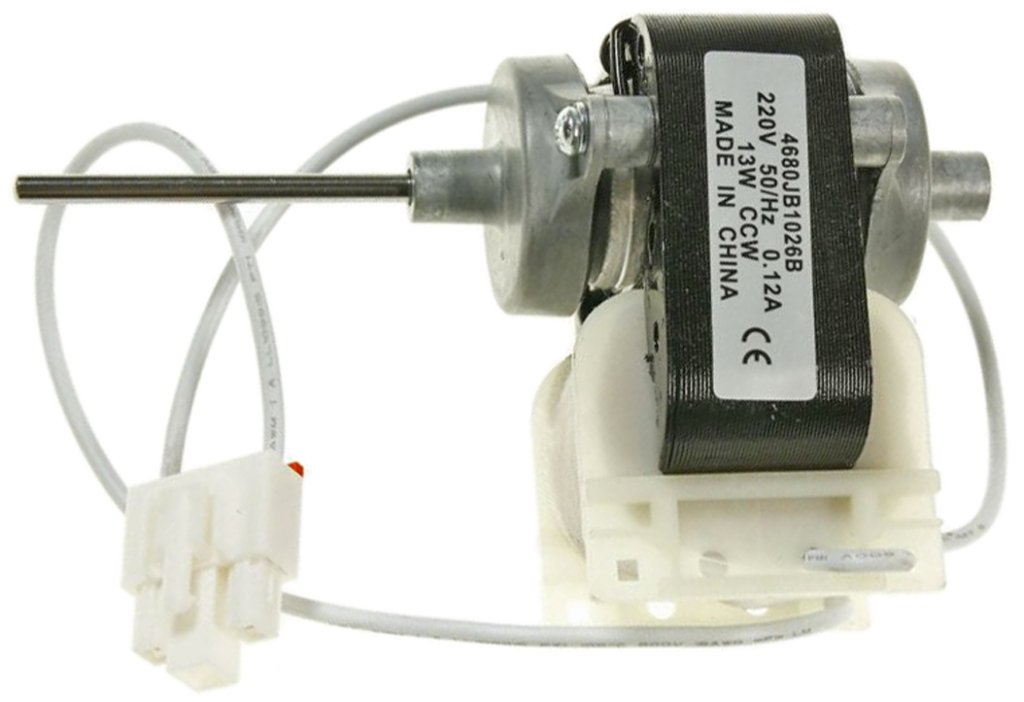
The condenser fan is located next to the condenser coils and helps to circulate the air over the coils to dissipate the heat. If the condenser fan is not working properly, the coils will not be able to release the heat and the refrigerator will not cool down. The condenser fan may stop working due to a faulty motor, a broken blade, or a blockage by debris or ice.
Solution: Replace or Repair the Condenser Fan
To replace or repair the condenser fan, you will need a screwdriver, a multimeter, and a replacement fan or motor if needed. Follow these steps:
- Unplug the refrigerator from the power source and move it away from the wall to access the back panel.
- Remove the screws that secure the back panel and take it off.
- Locate the condenser fan and inspect it for any signs of damage or obstruction. If the fan blade is broken or loose, you will need to replace the whole fan assembly. If the fan blade is intact, but the fan is not spinning, you will need to test the motor for continuity using the multimeter. If the motor does not have continuity, you will need to replace it. If the motor has continuity, but the fan is still not spinning, you will need to check the wiring and the control board for any defects.
- To replace the fan or the motor, disconnect the wires and remove the mounting screws or clips that hold the fan or the motor in place. Install the new fan or motor and reconnect the wires. Secure the fan or the motor with the screws or clips.
- Replace the back panel and secure it with the screws.
- Plug the refrigerator back in and check if the cooling performance has improved.
Faulty Evaporator Fan
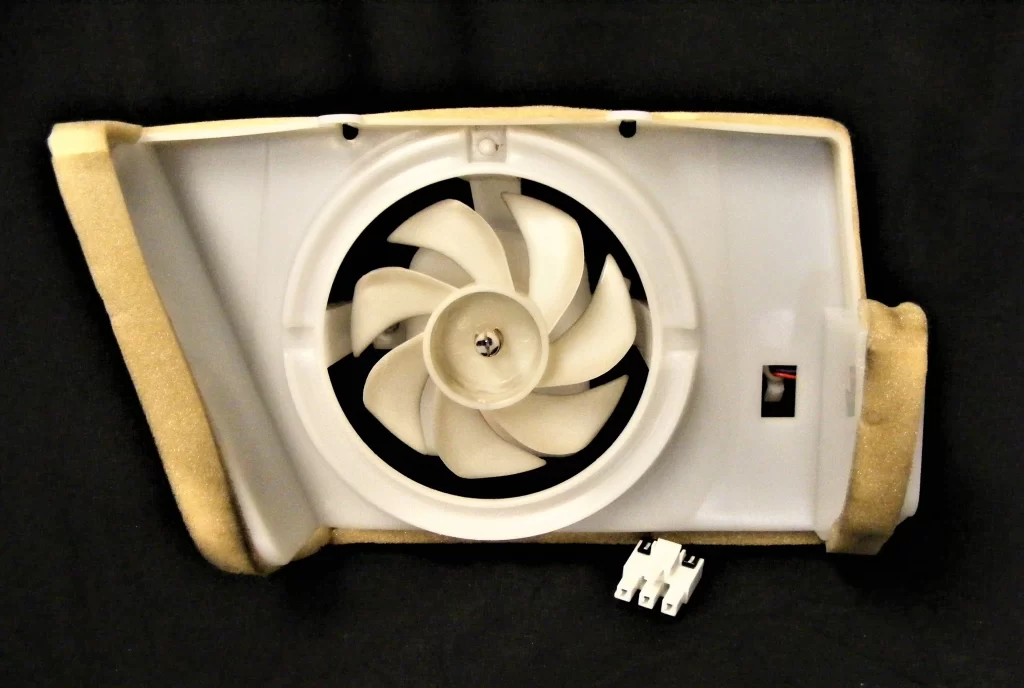
The evaporator fan is located inside the freezer compartment and helps to circulate the cold air from the evaporator coils to the fridge and freezer sections. If the evaporator fan is not working properly, the cold air will not reach the fridge and freezer sections and the refrigerator will not cool down. The evaporator fan may stop working due to a faulty motor, a broken blade, or a blockage by ice or frost.
Solution: Replace or Repair the Evaporator Fan
To replace or repair the evaporator fan, you will need a screwdriver, a multimeter, and a replacement fan or motor if needed. Follow these steps:
- Unplug the refrigerator from the power source and open the freezer door.
- Remove the shelves and baskets from the freezer and locate the access panel that covers the evaporator fan. Remove the screws that secure the access panel and take it off.
- Locate the evaporator fan and inspect it for any signs of damage or obstruction. If the fan blade is broken or loose, you will need to replace the whole fan assembly. If the fan blade is intact, but the fan is not spinning, you will need to test the motor for continuity using the multimeter. If the motor does not have continuity, you will need to replace it. If the motor has continuity, but the fan is still not spinning, you will need to check the wiring and the control board for any defects.
- To replace the fan or the motor, disconnect the wires and remove the mounting screws or clips that hold the fan or the motor in place. Install the new fan or motor and reconnect the wires. Secure the fan or the motor with the screws or clips.
- Replace the access panel and secure it with the screws.
- Plug the refrigerator back in and check if the cooling performance has improved.
Faulty Start Relay
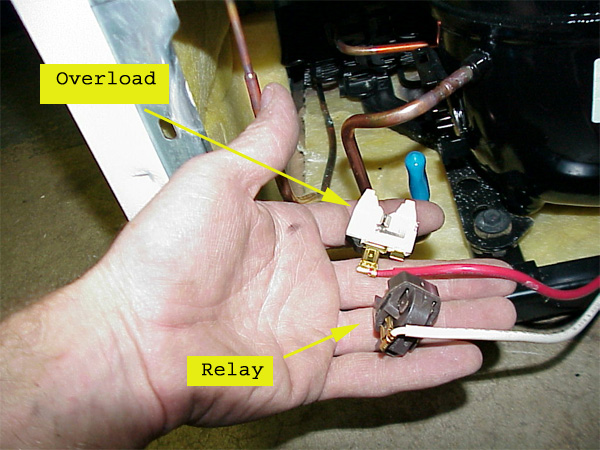
The start relay is a small device that helps to start the compressor by providing a boost of power. The start relay is attached to the side of the compressor and is connected to the start capacitor and the run capacitor. If the start relay is faulty, the compressor will not start or run properly and the refrigerator will not cool down. The start relay may fail due to wear and tear, power surges, or overheating.
Solution: Replace the Start Relay
To replace the start relay, you will need a screwdriver, a pair of pliers, and a replacement start relay. Follow these steps:
- Unplug the refrigerator from the power source and move it away from the wall to access the back panel.
- Remove the screws that secure the back panel and take it off.
- Locate the compressor and the start relay on the side of the compressor. The start relay is a small box-like device that is connected to the start capacitor and the run capacitor by wires. Disconnect the wires from the start relay using the pliers. Be careful not to touch the capacitors as they may still hold an electric charge.
- Remove the start relay from the compressor by pulling it off. You may hear a rattling sound if the start relay is broken.
- Install the new start relay by pushing it onto the compressor. Reconnect the wires to the start relay using the pliers.
- Replace the back panel and secure it with the screws.
- Plug the refrigerator back in and check if the cooling performance has improved.
Faulty Start Capacitor
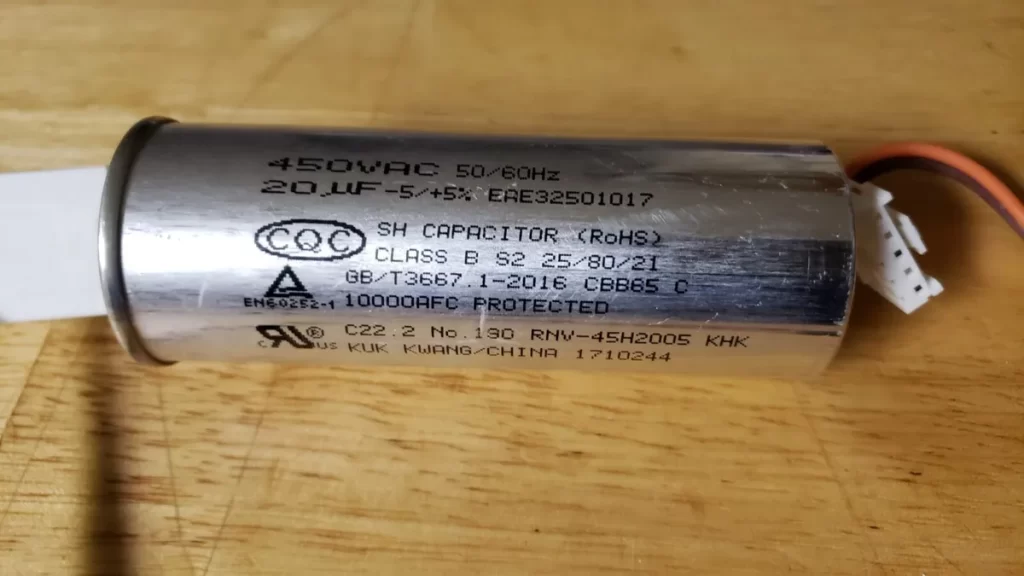
The start capacitor is a small cylindrical device that works with the start relay to provide a boost of power to the compressor. The start capacitor is attached to the side of the compressor and is connected to the start relay and the run capacitor by wires. If the start capacitor is faulty, the compressor will not start or run properly and the refrigerator will not cool down. The start capacitor may fail due to wear and tear, power surges, or overheating.
Solution: Replace the Start Capacitor
To replace the start capacitor, you will need a screwdriver, a pair of pliers, a multimeter, and a replacement start capacitor. Follow these steps:
- Unplug the refrigerator from the power source and move it away from the wall to access the back panel.
- Remove the screws that secure the back panel and take it off.
- Locate the compressor and the start capacitor on the side of the compressor. The start capacitor is a small cylindrical device that is connected to the start relay and the run capacitor by wires. Disconnect the wires from the start capacitor using the pliers. Be careful not to touch the capacitors as they may still hold an electric charge.
- Test the start capacitor for continuity using the multimeter. Set the multimeter to the ohms setting and touch the probes to the terminals of the start capacitor. The multimeter should show a low resistance reading and then gradually increase to infinity. If the multimeter shows no change or a constant reading, the start capacitor is faulty and needs to be replaced.
- Remove the start capacitor from the compressor by unscrewing the mounting bracket or clip that holds it in place. Install the new start capacitor and secure it with the mounting bracket or clip. Reconnect the wires to the start capacitor using the pliers.
- Replace the back panel and secure it with the screws.
- Plug the refrigerator back in and check if the cooling performance has improved.
Faulty Thermistor
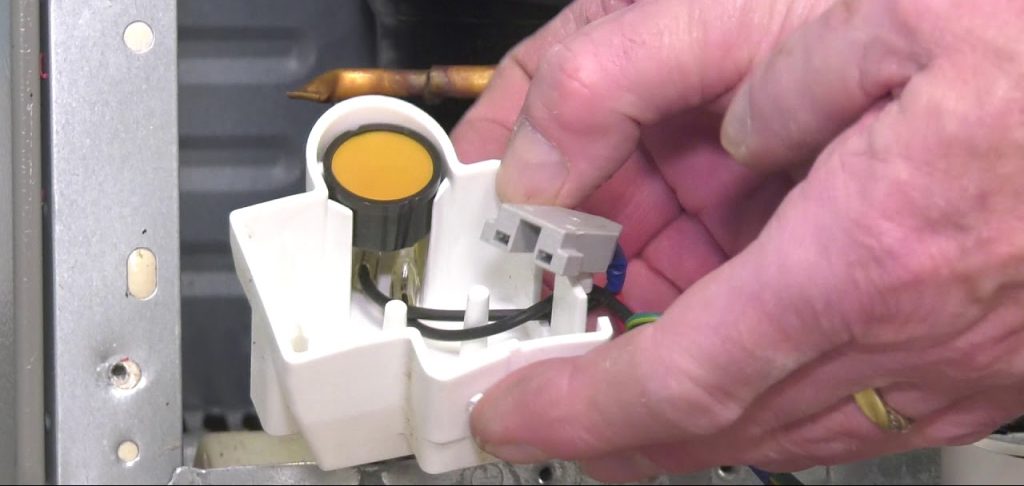
The thermistor is a small sensor that monitors the temperature inside the refrigerator and sends the signal to the control board to regulate the cooling cycle. If the thermistor is faulty, the control board will not receive the correct temperature reading and will not activate the compressor or the fans when needed. The refrigerator will either overcool or undercool, depending on the type of thermistor failure.
Solution: Replace the Thermistor
To replace the thermistor, you will need a screwdriver, a pair of pliers, a multimeter, and a replacement thermistor. Follow these steps:
- Unplug the refrigerator from the power source and open the refrigerator door.
- Locate the thermistor inside the refrigerator. It is usually attached to the wall of the fridge or the air duct. It may be covered by a plastic housing or a metal clip. Remove the housing or the clip and disconnect the wires from the thermistor using the pliers.
- Test the thermistor for resistance using the multimeter. Set the multimeter to the ohms setting and touch the probes to the terminals of the thermistor. The multimeter should show a resistance reading that changes according to the temperature. Refer to the owner’s manual or the manufacturer’s website for the correct resistance range for your model. If the multimeter shows no change or an out-of-range reading, the thermistor is faulty and needs to be replaced.
- Install the new thermistor and reconnect the wires using the pliers. Secure the thermistor with the housing or the clip.
- Plug the refrigerator back in and check if the cooling performance has improved.
Faulty Compressor
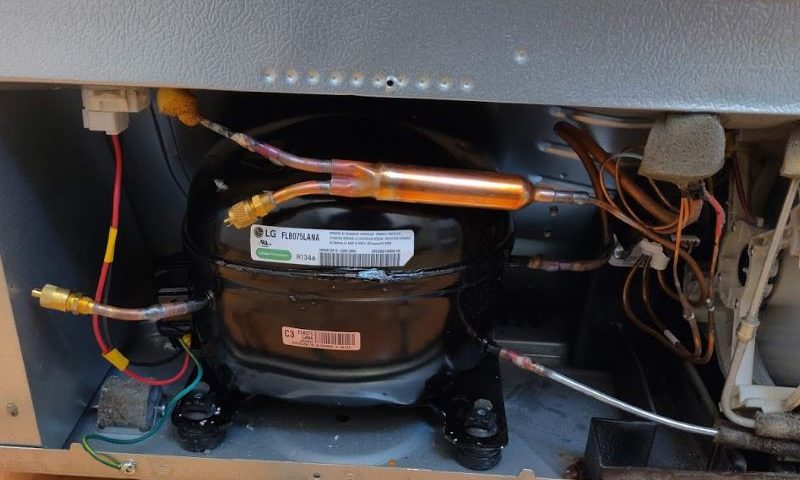
The compressor is the heart of the refrigerator and is responsible for compressing and circulating the refrigerant through the coils. The compressor is located at the back of the refrigerator and is connected to the start relay, the start capacitor, and the run capacitor. If the compressor is faulty, the refrigerator will not cool down at all. The compressor may fail due to wear and tear, power surges, or low refrigerant level.
Solution: Replace the Compressor
To replace the compressor, you will need a professional technician, as this is a complex and risky task that involves handling high-pressure refrigerant and electrical components. Do not attempt to replace the compressor by yourself, as you may cause more damage to the refrigerator or harm yourself. Contact a qualified LG service center and schedule an appointment for the compressor replacement.
Low Refrigerant Level
The refrigerant is the substance that absorbs and releases heat inside the refrigerator. The refrigerant flows through the coils and changes its state from liquid to gas and back. The refrigerant level should be maintained at a certain level for the refrigerator to work properly. If the refrigerant level is low, the refrigerator will not cool down sufficiently. The refrigerant level may drop due to a leak in the system, a faulty valve, or a faulty compressor.
Solution: Recharge the Refrigerant
To recharge the refrigerant, you will need a professional technician, as this is a complex and risky task that involves handling high-pressure refrigerant and electrical components. Do not attempt to recharge the refrigerant by yourself, as you may cause more damage to the refrigerator or harm yourself. Contact a qualified LG service center and schedule an appointment for the refrigerant recharge.
How to Prevent LG Refrigerator Not Cooling in the Future
To prevent your LG refrigerator from not cooling in the future, you can follow some simple maintenance tips, such as:
- Clean the condenser coils regularly, at least once every six months, to remove dust and dirt that can affect the heat transfer and cooling efficiency.
- Check the condenser fan and the evaporator fan for any signs of damage or obstruction and replace or repair them if needed.
- Check the start relay, the start capacitor, and the run capacitor for any signs of wear and tear or damage and replace them if needed.
- Check the thermistor for any signs of malfunction or damage and replace it if needed.
- Check the compressor for any signs of wear and tear or damage and replace it if needed.
- Check the refrigerant level and the system for any signs of leaks or faults and recharge or repair them if needed.
- Avoid placing hot or warm food inside the refrigerator, as this will increase the cooling load and make the refrigerator work harder.
- Avoid opening and closing the refrigerator door frequently, as this will let the cold air escape and make the refrigerator work harder.
- Adjust the temperature settings according to the ambient temperature and the amount of food stored in the refrigerator, as this will optimize the cooling performance and energy consumption.
Clean the Condenser Coils Regularly
The condenser coils are located at the back of the refrigerator and are responsible for releasing the heat that is absorbed by the refrigerant from the inside of the fridge. Over time, the condenser coils can get dirty and dusty, which reduces their efficiency and makes the refrigerator work harder to cool down. This can result in higher energy consumption and poor cooling performance.
To clean the condenser coils, you will need a vacuum cleaner, a soft brush, and a cloth. You can follow the steps in the previous section to clean the condenser coils properly and safely. Cleaning the condenser coils regularly will help to improve the cooling performance and extend the lifespan of your refrigerator.
Check the Fans for Any Signs of Damage or Obstruction
The condenser fan and the evaporator fan are located next to the condenser coils and inside the freezer compartment, respectively. They help to circulate the air over the coils to dissipate the heat and distribute the cold air. If the fans are not working properly, the coils will not be able to release the heat and the cold air will not reach the fridge and freezer sections.
The fans may stop working due to a faulty motor, a broken blade, or a blockage by debris or ice. You can follow the steps in the previous section to replace or repair the fans if needed. Checking the fans regularly will help to prevent overheating and undercooling problems and ensure optimal cooling performance.
Check the Start and Run Devices for Any Signs of Wear and Tear or Damage
The start relay, the start capacitor, and the run capacitor are small devices that help to start and run the compressor by providing a boost of power. They are attached to the side of the compressor and are connected by wires. If any of these devices are faulty, the compressor will not start or run properly and the refrigerator will not cool down.
The devices may fail due to wear and tear, power surges, or overheating. You can follow the steps in the previous section to replace the devices if needed. Checking the devices regularly will help to prevent compressor failure and ensure smooth and efficient cooling operation.
Check the Thermistor for Any Signs of Malfunction or Damage
The thermistor is a small sensor that monitors the temperature inside the refrigerator and sends the signal to the control board to regulate the cooling cycle. If the thermistor is faulty, the control board will not receive the correct temperature reading and will not activate the compressor or the fans when needed.
The refrigerator will either overcool or undercool, depending on the type of thermistor failure. You can follow the steps in the previous section to replace the thermistor if needed. Checking the thermistor regularly will help to prevent temperature fluctuations and ensure accurate and consistent cooling performance.
Check the Compressor for Any Signs of Wear and Tear or Damage
The compressor is the heart of the refrigerator and is responsible for compressing and circulating the refrigerant through the coils. The compressor is located at the back of the refrigerator and is connected to the start relay, the start capacitor, and the run capacitor. If the compressor is faulty, the refrigerator will not cool down at all.
The compressor may fail due to wear and tear, power surges, or low refrigerant level. You can follow the steps in the previous section to replace the compressor if needed. However, this is a complex and risky task that requires professional assistance. Checking the compressor regularly will help to prevent complete cooling failure and ensure long-lasting and reliable cooling performance.
Check the Refrigerant Level and the System for Any Signs of Leaks or Faults
The refrigerant is the substance that absorbs and releases heat inside the refrigerator. The refrigerant flows through the coils and changes its state from liquid to gas and back. The refrigerant level should be maintained at a certain level for the refrigerator to work properly. If the refrigerant level is low, the refrigerator will not cool down sufficiently.
The refrigerant level may drop due to a leak in the system, a faulty valve, or a faulty compressor. You can follow the steps in the previous section to recharge the refrigerant if needed. However, this is a complex and risky task that requires professional assistance. Checking the refrigerant level and the system regularly will help to prevent insufficient cooling and ensure proper and safe cooling function.
Avoid Placing Hot or Warm Food Inside the Refrigerator

When you place hot or warm food inside the refrigerator, the food will release heat and raise the temperature inside the fridge. This will make the refrigerator work harder to cool down the food and the fridge. This will result in higher energy consumption and lower cooling efficiency.
To avoid this, you should let the food cool down to room temperature before placing it inside the refrigerator. This will help to reduce the cooling load and improve the cooling performance and energy consumption.
Avoid Opening and Closing the Refrigerator Door Frequently
Every time you open and close the refrigerator door, you let some of the cold air escape and some of the warm air enter. This will affect the temperature and the humidity inside the fridge and make the refrigerator work harder to maintain the desired cooling level. This will result in higher energy consumption and lower cooling efficiency.
To avoid this, you should open and close the refrigerator door as quickly and as infrequently as possible. You should also make sure that the door is properly sealed and aligned and that the gasket is not damaged or worn out. This will help to prevent the cold air from escaping and improve the cooling performance and energy consumption.
Adjust the Temperature Settings According to the Ambient Temperature and the Amount of Food Stored in the Refrigerator
The temperature settings of the refrigerator are not fixed and can be adjusted according to the external and internal factors that affect the cooling performance. The external factors include the ambient temperature, the humidity, and the ventilation of the room where the refrigerator is placed. The internal factors include the amount, the type, and the arrangement of the food stored in the refrigerator.
You should adjust the temperature settings according to these factors to achieve the optimal cooling level and energy consumption. The ideal temperature for the fridge compartment is between 1°C and 7°C, and for the freezer compartment is between -15°C and -23°C. You can use an appliance thermometer or a digital thermometer to measure the temperature inside the fridge and freezer compartments and adjust the settings accordingly.
You should also avoid overloading or underloading the refrigerator, as this will affect the air circulation and the cooling efficiency. You should arrange the food in such a way that there is enough space for the air to flow and that the vents are not blocked. This will help to optimize the cooling performance and energy consumption.
Conclusion
LG refrigerator not cooling is a common problem that can have various causes and solutions. Some of the causes are simple and easy to fix, such as dirty condenser coils or faulty fans, while others are complex and require professional assistance, such as faulty compressor or low refrigerant level. By following the steps and tips in this post, you can troubleshoot and fix your LG refrigerator not cooling problem and prevent it from happening again in the future.
If you need further help or advice, you can contact the LG customer service or a qualified LG service center and schedule an appointment for the repair or replacement of your refrigerator. We hope this post was helpful and informative for you. Thank you for reading and have a great day!
FAQs
How do I reset my LG refrigerator?
To reset your LG refrigerator, you can try unplugging it from the power source and waiting for a few minutes before plugging it back in. This may clear some minor glitches or errors in the system. Alternatively, you can try pressing and holding the power button on the control panel for a few seconds until the display turns off and then turns back on. This may reset the control board and the settings.
How do I know if my LG refrigerator is under warranty?
To know if your LG refrigerator is under warranty, you can check the owner’s manual or the receipt for the purchase date and the warranty period. You can also contact the LG customer service and provide them with the model number and the serial number of your refrigerator to verify the warranty status.
How much does it cost to repair or replace an LG refrigerator compressor?
The cost to repair or replace an LG refrigerator compressor may vary depending on the model, the type of compressor, the extent of damage, and the labor charges. According to some online sources, the average cost to repair or replace an LG refrigerator compressor ranges from $300 to $600, excluding the service fee.
How long does an LG refrigerator last?
The lifespan of an LG refrigerator may depend on several factors, such as the model, the usage, the maintenance, and the quality. According to some online sources, the average lifespan of an LG refrigerator is about 15 years, but it may vary depending on the individual circumstances.
How long does it take for the LG refrigerator to cool down after cleaning the condenser coils or replacing the fans?
It may take up to 24 hours for the LG refrigerator to cool down to the normal temperature after cleaning the condenser coils or replacing the fans. This is because the refrigerator needs time to stabilize and adjust to the new conditions. You should avoid opening and closing the refrigerator door frequently during this period, as this will delay the cooling process. You can use an appliance thermometer or a digital thermometer to check the temperature inside the fridge and freezer compartments and make sure they are within the ideal range.
How do I know if the start relay, the start capacitor, or the run capacitor is faulty?
One way to check if the start relay, the start capacitor, or the run capacitor is faulty is to listen for a clicking sound coming from the back of the refrigerator. The clicking sound indicates that the start relay is trying to start the compressor but fails to do so. This may be due to a faulty start relay, a faulty start capacitor, or a faulty run capacitor. Another way to check if the start relay, the start capacitor, or the run capacitor is faulty is to test them for continuity using a multimeter. You can follow the steps in the previous section to test the devices for continuity and replace them if needed.
How do I know if the thermistor is malfunctioning or damaged?
One way to check if the thermistor is malfunctioning or damaged is to look for an error code on the display screen of the refrigerator. Some of the error codes that indicate a thermistor problem are ER dH, ER rF, ER rS, ER rt, ER rf, and ER rH. You can refer to the owner’s manual or the manufacturer’s website for the meaning and the solution of each error code. Another way to check if the thermistor is malfunctioning or damaged is to test it for resistance using a multimeter. You can follow the steps in the previous section to test the thermistor for resistance and replace it if needed.
How do I know if the compressor is faulty or damaged?
One way to check if the compressor is faulty or damaged is to listen for a humming or buzzing sound coming from the back of the refrigerator. The humming or buzzing sound indicates that the compressor is running but not cooling properly. This may be due to a faulty compressor, a low refrigerant level, or a leak in the system. Another way to check if the compressor is faulty or damaged is to touch the compressor and feel its temperature. The compressor should be warm but not hot. If the compressor is too hot or too cold, it may be faulty or damaged.
How do I know if the refrigerant level is low or if there is a leak in the system?
One way to check if the refrigerant level is low or if there is a leak in the system is to look for signs of frost or ice buildup on the evaporator coils or the back wall of the freezer. Frost or ice buildup indicates that the refrigerant is not circulating properly and is freezing on the coils or the wall. This may be due to a low refrigerant level, a leak in the system, or a faulty valve. Another way to check if the refrigerant level is low or if there is a leak in the system is to use a leak detector or a soap solution. You can follow the steps in the previous section to use a leak detector or a soap solution to detect and locate the leak in the system.
About Author
Anselam Ozioma
Anselam Ozioma is the founder and editor of refrigeratorfixes.com, a website dedicated to providing helpful and practical information and solutions for various refrigerator issues. Anselam Ozioma is a certified refrigerator technician with over 10 years of experience in repairing and maintaining different brands and models of refrigerators. He is passionate about sharing his knowledge and expertise with his readers and helping them to troubleshoot and fix their refrigerator problems. Anselam Ozioma also reviews and recommends the best refrigerators and accessories on the market, based on his personal and professional experience. Anselam Ozioma lives in Abuja, Nigeria, with his wife and two children. When he is not working on his website or fixing refrigerators, he enjoys reading, playing soccer, and spending time with his family.